


What are free Google Shopping listings?
Well, they’re a little bit like organic search listings. But, they don’t appear on the main search results page. If you want to see them, you need to visit the ‘shopping’ tab:

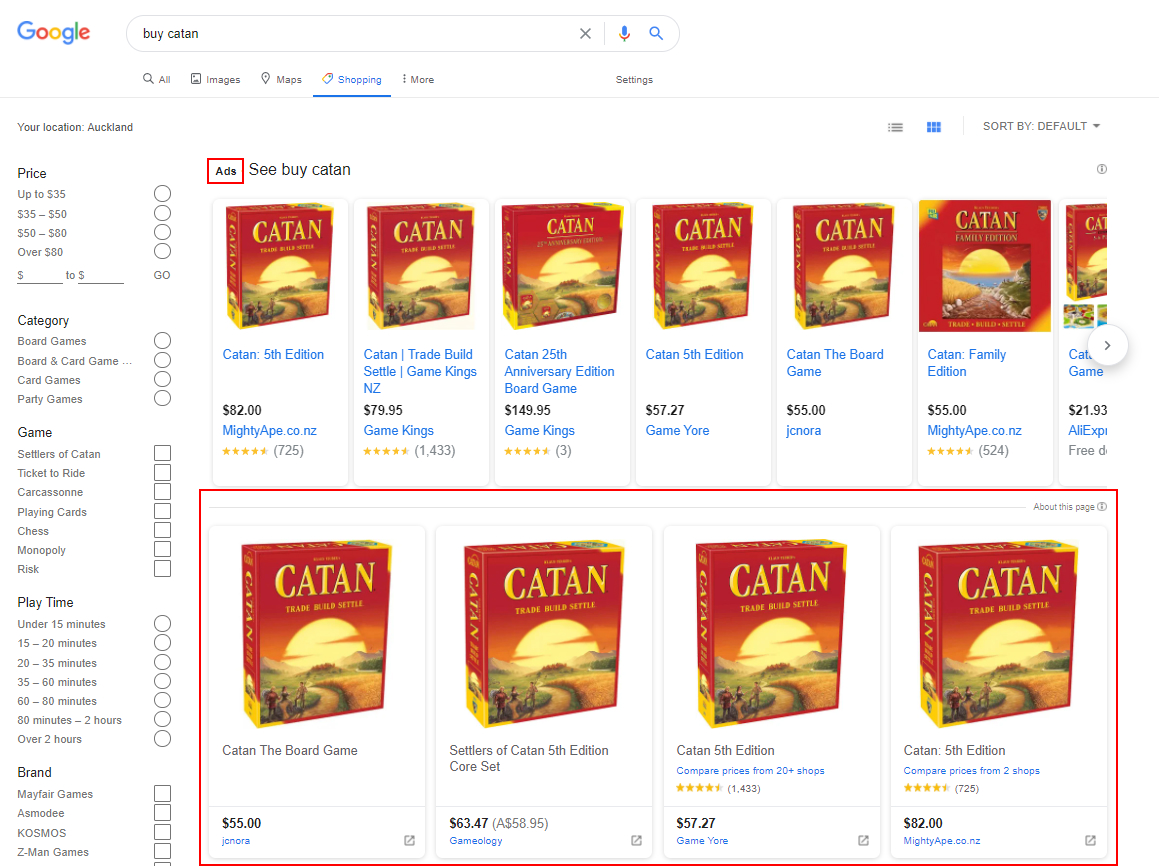
Look out for the little ‘Ad’ marker that defines which listings are ads. Beneath the ads you’ll see all the free listings:
With the right implementation and optimisation, Free Google Shopping Listings offer an opportunity for retailers to sell on Google Shopping without having to pay for the clicks.
On top of this, these free Google product listings also offer incremental traffic and sales gains for sellers who are already utilising Google Shopping.
Compared to standard Google Shopping, which requires the use of Google Ads, the adoption of the Google Shopping tab by users has been slow. The pool of users is a lot smaller, but our data has indicated conversion rates are around 90% higher than standard Google Shopping and organic listings.
When you think about it, this makes sense. Users who visit the Google Shopping tab are much further down the funnel.
We’ve also seen individual NZ and global retailers gaining millions of impressions and thousands of clicks for free. Basically, if you’re an NZ retailer, you need to be showing here.
Where Google shows your free listings
The main location that your products will appear is on the Google Shopping tab as illustrated above. However, there are a few other locations that Google will sometimes show your products for free.
Google Images
Google may choose to promote your products for free above product images when people are searching for images of relevant products.

YouTube
In some rare cases your products can show up next to relevant YouTube videos.
Google Search
It is also possible that Google will choose to display your products on the main Google Search tab as a Rich Listing. Note, this appears to be fairly uncommon.
How do you set up free Google Shopping listings?
Google doesn’t provide much helpful information for troubleshooting issues with Free Google Product Listings. Whether you’re an agency or a retailer, finding out the right things to do are just about impossible.
With that said, we’ve researched, tested and identified the right steps to go through to maximise your chances of appearing as high as possible in the free shopping listings.
The first step is setting up a feed. For small retailers, this can be done manually with Google Sheets, but for most businesses you’ll want an automated solution. This is something we can help you with.
Most store CMS platforms, including Shopify, offer plugins that can generate a high-quality, automatically updated feed. You’ll want to create a feed (either with help or through a plugin), then set up a merchant centre account and connect your feed to it.
Once you have a feed and Merchant Centre account made, go through the below steps to ensure Google loves you:
- Ensure your feed is tidy - include all of the required Google attributes below, as well as many additional ones as relevant (in particular the ‘availability’ attribute.
- Doublecheck all attributes are populated accurately, especially pricing and GTINs.
- Check that you’ve opted in to free listings.
- Try to provide Brand, MPN and/or GTIN attributes if possible.
- Minimise disapprovals by identifying them under the diagnostics tab and working through resolving them. GTIN disapprovals can be cleared with the use of a supplemental feed.
- Include shipping details - even in New Zealand where they aren’t required for paid ads.
- Build trust by filling out ALL of the data under the wrench icon in Google Merchant Centre. This means put in your address, phone number, contact details, everything.
- Link as many third party accounts as possible. Common ones are Google Ads, Google My Business and Paypal.
- Consider using the ‘canonical_link’ attribute. Usually it’s easy for Google to crawl your site and find the default URL, but by providing a canonical link you will make it easier for Google to index your free listings.
- Join customer reviews / seller ratings to build trust.
Also make sure to fill out any of the below required attributes that are relevant for your feed.
Google Requirements
- description (required for all products)
- availability (required for all products)
- condition (required for each used or refurbished product)
- brand (required for each product with a clearly associated brand or manufacturer)
- gtin (required for all products with a GTIN assigned by the manufacturer)
- mpn (required for all products without a manufacturer-assigned GTIN)
- multipack (required if your product is a multipack)
- is_bundle (required if your product is a bundle)
- color (required for Apparel & Accessories)
- size (required for Apparel & Accessories)
- age_group (required for Apparel & Accessories)
- gender (required for Apparel & Accessories)
- item_group_id (required for product variants)
- shipping (required when you need to override your shipping settings in Merchant Center)
- tax (required in the US when you need to override your account tax settings in Merchant Center)
How to track Google free product listings
This is where things get a bit more technical - but we’d say it’s pretty important that you are able to measure the performance of your free Google Shopping listings. Sure, most advertisers don’t do this, but we’re sure you don’t want to be ‘most advertisers’.
Where relevant, we implement URL tracking directly in our clients’ Google Shopping feeds. If you’re the DIY digital marketer type, here’s how we do it.
In order to track where users come from on your website, you need to append tracking codes to your url. These codes provide data to Google Analytics about the user.
By default, Google Ads appends a GCLID code to the end of every URL. This is an encrypted UTM tag that includes data such as the keyword, campaign and ad the user clicked that brought them to your website.
Normally, you wouldn’t need to think about this, however, Google free product listings don’t run through Google Ads - instead, they are pulled directly from your feed in Google Merchant Centre.
As with emails and social advertising, you will need to append any data you want to track to the end of your free google shopping listing URLs in order to track everything properly in Google Analytics. The usual way to do this is with UTM tags.
By default, Google Merchant Centre tags your free product listings as source=google and medium=organic. This is misleading as it clumps your free shopping clicks into a bucket alongside normal organic listing traffic. It also doesn’t provide all the information you may require to analyse the performance of this traffic.
We recommend the following:
?utm_source=google&utm_medium=surfaces&utm_campaign=shopping&utm_content={{product-type}}
However, an easier alternative would be this:
?utm_source=google&utm_medium=organic&utm_campaign=shopping&utm_content=surfaces
The first option, and the one we recommend, enables you to treat your free shopping ads traffic as a distinct traffic source within your source/medium report in Google Analytics. It also allows you to easily dive into the data to measure how this traffic performs across different product categories.
So, how do you set these tracking codes up?
It’s quite easy with custom rules:
- Sign into Google Merchant Centre
- Click Products > Feeds > Your Feed > Feed Rules
- Click the + icon and select the ‘link’ attribute
- Select ‘Add Modification’ then ‘Append’
- In the Append box type: ‘?utm_source=google&utm_medium=surfaces&utm_campaign=google-shopping&utm_content=’ select it, then type ‘product type’ and select the attribute for it.
- If you already have parameters on your URL, make sure to swap the ‘?’ for an ‘&’.
- Save the rule.
- Sign into Google Analytics and confirm that the Property Settings doesn’t have the ‘Allow manual tagging to override auto-tagging’ button ticked (if you need to untick this for whatever reason, then we have a solution below).

So, what if you rely on UTMs for tracking in Google Ads?
Luckily, Google Merchant Centre has an attribute just for ads called: ‘ads_redirect’
You can follow the above steps but select the ‘ads_redirect’ attribute in step 3. Then apply the UTM tags you require for your ads here.
From Blog
Recent posts


A digital marketing agency based in Auckland, New Zealand.